Note: The Delay Line Dock Panel is opened in the Timing Menuby pressing the expand button of the Delay Line menu.
To add timing to the Delay Line, do the following:
Method 1
First select the initialization (starting point) hole on the Delay Line with left mouse button. The whole Delay Line with the selected hole will be selected and colored blue.
Enter the desired delay values on the Delay Line Dock panel.
Press the Apply button to add the timing to the Delay Line.
Method 2 (Fastest and Preferred method)
Enter the desired delay values on the Delay Line Dock panel.
Press the reference line button. Remember BLASTMAPTM will stay in this user mode until a new action is taken.
Right click on the initialization hole , a popup menu will apear.
Left click on the apply popup menu item.
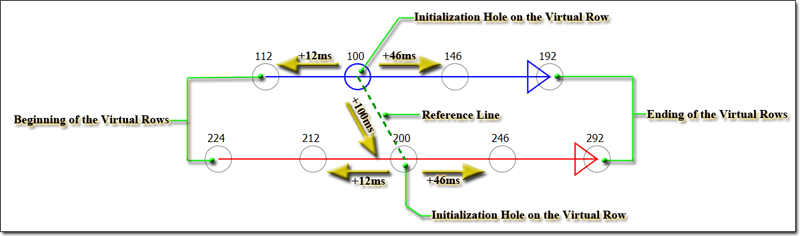
Using the Reference Line
When adding timing from one Delay Line to the next use the reference line to indicate the source hole delay to increment / decrement from and the initialization hole of Delay Line that needs to be timed.
Note: If the initialization point of the source Delay Line is the reference to increment / decrement from, it is not necessary for the reference line. BLASTMAPTM will use the lastly timed Delay Line Initialization point as the reference.
How to use the reference line:
Press the Reference Line button in the Delay Line Dock Panel.
Then left-click on the source hole to reference from.
Left-click on the initialization hole of the destination Delay Line.
The reference line is indicated by a green dotted line.